| Introduction |
|
The BetterBottle
SimpleFlo™ Valve and Racking Adapters make up the first valve
system that truly addresses the specialized needs of home
winemakers and home brewers. The components are made of an
incredibly tough, proprietary PET that does not stain or impart
flavors and is easily cleaned and sanitized. BetterBottle Racking
Adapters use a Teflon-encapsulated, Viton O-ring to make a clean,
tight seal against the inside wall of carboys and pails, so
the Racking Adapter's screw threads and tightening nut are
outside of the container (see Installation below).
BetterBottle Racking Adapters are also very simple to install and
remove, making thorough cleaning and sanitizing especially easy.
Now, it is possible to rack and bottle professionally, without
siphons or pumps.
General purpose
tank valves are designed in exactly the opposite fashion, with the
seals being made against the outside wall of carboys or pails. This
leaves all the crevices associated with the threads and nuts on the
inside of the container. Such valves are not designed for racking;
they will not drain the last 2 inches (5 cm) of liquid from a carboy
without tipping the carboy and potentially disturbing the sediment
layer, because they cannot be installed any lower. Furthermore, they
are difficult to attach or remove from a carboy, they can be
difficult to disassemble for cleaning and sanitizing, and there is a
good chance they are made of materials that will be damaged by the
detergents and sanitizers used in home winemaking and beer brewing.
General Purpose Tank
Valves
- They
Seal against the outside walls of carboys and have internal threads
and nuts -
Additional
Information - Use the pop up menus
associated with the SimpleFlo
Valve and Racking Adapter tabs at the left side of this page for random access
to all the specific information relating to the BetterBottle
SimpleFlo valve and Racking Adapters. Scrolling down this page will
access the information for Racking Adapters in sequential fashion.
For materials specifications, please refer to the Technical tab
at the top of this page.
Chemical
Resistance - In general, avoid very
strong caustics, such as KOH and NaOH (lyes), and concentrated
aliphatic ketones (e.g., essence oils). For additional materials
specifications, please refer to the Technical tab
at the top of this page.
|
| Carboy
Racking Adapter |
|
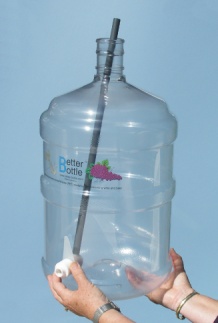
Description
- BetterBottle Carboy Racking Adapters
couple SimpleFlo™ valves to any ported BetterBottle carboy, and the
combination makes professional racking and
bottling quick and easy.
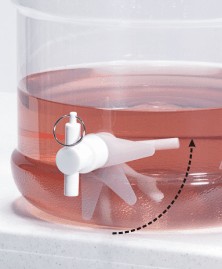
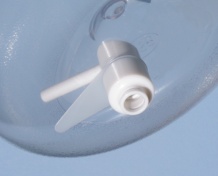
Operation - The
Carboy Racking Adapter uses a Teflon-encapsulated Viton O-ring to
make a tight hydrophobic seal against the inside wall of a
BetterBottle carboy. This very special O-ring also makes it possible
to rotate the body of the Racking Adapter, without the need for
lubrication. Racking is accomplished by simply rotating the Adapter
so the tip of its intake stem is just above the sediment layer,
opening the SimpleFlo valve, and letting gravity go to work - there
is no need for siphons or pumps. During filling and fermentation,
the stem of the Racking Adapter should be tilted slightly downward
(about 3:30 or 8:30) to prevent sediments from settling inside it.
The external pointer makes it possible to adjust the position of the
stem even if the stem cannot be seen through a dark wine or beer.
The Carboy Racking Adapter is especially
popular with winemakers and brewers who ferment on shelves, because
carboys can be racked without having to move them to a surface with
head room for racking canes. For more detailed information about the
use of the Racking Adapter refer to the
How-To Tips tab to the left of this page.
|
|
Installation - The BetterBottle Carboy Racking Adapter has been
designed so it is easy to install and service. Be certain all of the
component parts are installed in the correct order. Do not attempt
to drill ports in unported BetterBottle carboys, because the special
PET from which the carboys are made is very tough and specialized
tools are required to make sufficiently smooth
holes.
|
|
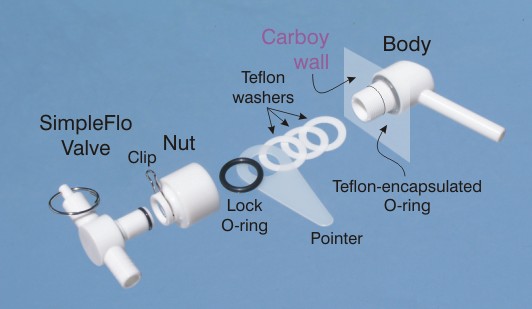
Carboy Racking Adapter
- Sequence of Components -
Note: SimpleFlo Valves are not included as part of
Adapters - order them separately.
|
|
|
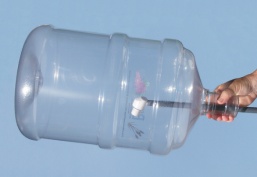
Installation in 5 & 6
Gallon Carboys - BetterBottle
makes a plastic installation tube for installing Carboy
Racking Adapters in 5 or 6 gallon BetterBottle carboys (See
images below). In a pinch, it is also possible to use a 50 cm
(20") length of 1/4" diameter steel (plated or stainless) rod
or running thread or a 44 cm (18") length of 3/8" inside
diameter (clearance) rigid tubing, both of which can be
purchased at most hardware stores.
 |
 |
| 1.
With the Teflon-encapsulated O-ring in place, use a tube
or rod to slide the Racking Adapter body into the neck
of a carboy. |
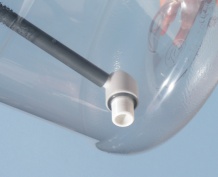
2.
Guide the threaded portion of the Racking Adapter body
into the hole in the side of the carboy. |
 |
 |
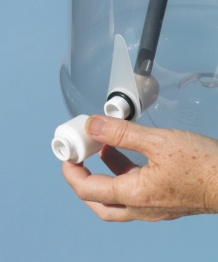
| 3.
Hold the Racking Adapter body in place with the rod or
tube and install the three Teflon slip washers, the
pointer (if desired), and the locking O-ring in that
order. Apply a little water to the threads and install
the nut. |
4.
Finger tighten the nut, using enough force so the
Racking Adapter makes a good seal and can be
comfortably, but not easily, rotated by hand. A sticky
pad (jar opener) can make tightening easier. Observe the
position of the pointer with respect to the stem of the
Racking Adapter. Assuming the pointer and stem are not
aligned, loosen the nut and reposition the pointer, so
it will line up with the stem when the nut is
re-tightened. Re-tighten the nut. It may be necessary to
repeat this last step a number of times in order to
achieve adequate pressure on the seals and line up the
pointer. |
 |
| 5. Slide out the tube or rod and
double check that the Outlet assembly rotates smoothly,
but with enough resistance to indicate a good seal.
Adjust the tightness of the nut as required.
|
Installation in 3 Gallon Carboys-
A rod or tube is not needed to
install a Racking Adapter in a 3 gallon BetterBottle bottle,
because the stem of the outlet will contact the bottom of the
carboy and prevent the Adapter from rotating continuously in
one direction.
- Drop the body of the Racking Adapter,
with the Teflon-encapsulated O-ring in place, into the
bottle and guide the threaded part of the body through the
hole in the side of the bottle with a stiff piece of wire or
something like a small screwdriver inserted through the hole
from outside the bottle.
- Once the thread pokes through the
hole, pull it all the way into the hole and install the
three Teflon slip washers, the pointer (if desired), the
locking O-ring, and the nut in that order. Apply a little
water to the threads and install the nut.
- Finger tighten the nut, using enough
force so the Racking Adapter makes a good seal and can be
comfortably, but not easily, rotated by hand. A sticky pad
(jar opener) can make tightening easier. Observe the
position of the pointer with respect to the stem of the
Racking Adapter. Assuming the pointer and stem are not
aligned, loosen the nut and reposition the pointer, so it
will line up with the stem when the nut is re-tightened.
Re-tighten the nut. It may be necessary to repeat this last
step a number of times in order to achieve adequate pressure
on the seals and line up the pointer.
| |
| Pail
Racking Adapter |
|
 Description - BetterBottle Pail Racking Adapters couple SimpleFlo
valves to any plastic pail, and the combination makes racking from a
pail into a BetterBottle carboy for secondary fermentation clean and
simple. Description - BetterBottle Pail Racking Adapters couple SimpleFlo
valves to any plastic pail, and the combination makes racking from a
pail into a BetterBottle carboy for secondary fermentation clean and
simple.
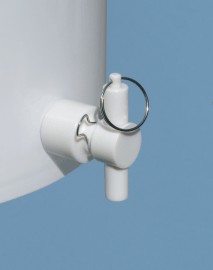
Operation - The
Pail Racking Adapter uses a Viton O-ring to make a tight, static
seal against the inside wall of a pail. Racking simply requires
opening the SimpleFlo valve, and letting gravity go to work - there
is no need for siphons or pumps. Usually, the Pail Adapter is
installed so that a level pail will drain to just above the expected
level of the sediment layer. If some usable liquid remains above the
sediment layer, the pail can be tipped slightly in order to recover
this liquid. For more detailed information about the use of the Pail
Adapter refer to the How-To
Tips tab to the left of this
page.
|
|
Installation - The
BetterBottle Pail Racking Adapter has been designed so it is easy to
install and service. Be certain all of the component parts are
installed in the correct order. Hold the body of the Pail Adapter in
place and install the Teflon slip washer and locking O-ring in that
order. Apply a little water to the threads and install the nut.
Finger tighten the nut, using enough force so the Pail Adapter makes
a good seal. A sticky pad (jar opener) can make tightening
easier.
|
|
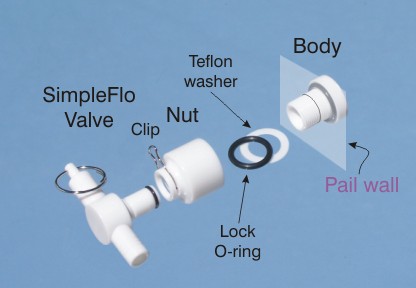
Pail Racking Adapter
- Sequence of Components -
Note: SimpleFlo Valves are not included as part of
Adatpers, order them separately.
|
|
Most pails used for winemaking and brewing are
made of HDPE and it is easy to make a 3/4" (2 cm) hole in their
sides for a BetterBottle Pail Adapter.
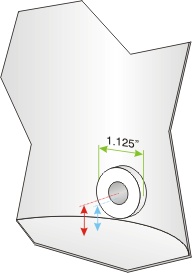 |
Refer to the figure to the right and
decide where to position the hole in the wall of the pail. The
depth of liquid (BLUE) left in a pail, when it is level and
drained through a Pail Adapter and SimpleFlo valve, will be
1/8" (0.3 cm) below the center of the hole (RED). The center
of the hole must be at least 3/4" (2 cm) above the bottom of
the pail so the wall can flex and seal with the Pail Adapter
O-ring. At this height, the residual liquid will be 5/8" (1.6
cm) deep. The sediment produced by most wine kits started in
30 liter pails is approximately that deep. If the center of
the hole in the pail is 1" (2.5 cm) above the bottom of the
pail, the residual liquid will be 7/8" (2.2 cm) deep. Because
the bottoms of pails vary in thickness and are usually
recessed, it is best to make the measurement for the center of
the hole from the inside of a pail and press a sharp pointed
tool through the wall to locate the
center from the outside. |
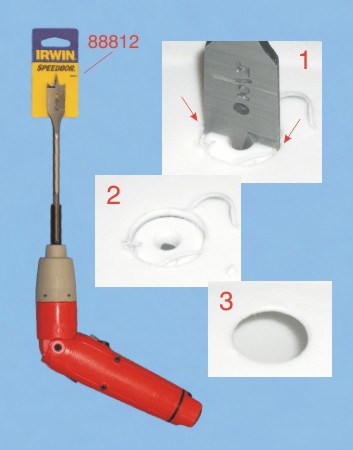
| A 3/4" hole saw or an electrician's
knock out punch will make a clean hole. Drill slowly with the
hole saw.
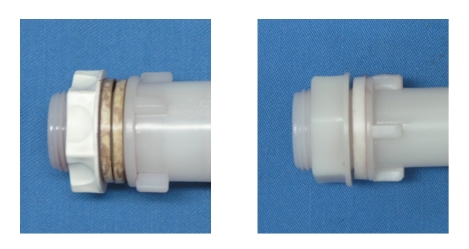
If you do not have these tools, you can
use an inexpensive (~$4.00) spade wood drill bit. Most
hardware stores stock the #88812 Irwin Speedbor bit or an
equivalent. The bit has a hex shank that will fit nicely into
an electric screwdriver. You can use a drill, but the low
speed of a screwdriver is ideal for this purpose. The bit has
points (See #1 arrows) that are the right length to just cut
through the wall of most pails before the broad part of the
bit begins to cut. Do not attempt to drill all the way
through. Once the points of the bit have cut through the wall,
you can press the plug (See #2) out of the hole and leave a
clean edge (See #3)
|
| |
| Cleaning /
Sanitizing |
|
The special PET from
which BetterBottle Carboy and Pail Adapters and SimpleFlo valves are
made has a non-porous, hydrophobic surface, making these parts
extremely easy to clean and sanitize. In theory, it should not be
necessary to remove and disassemble Carboy or Pail Adapters and
SimpleFlo valves to wash and sanitize them between batches, provided
care is taken to expose all of the internal parts to wash and
sanitizing solutions. However, a major advantage of BetterBottle
fittings is the ease with which they can be completely disassembled
and reassembled, so it makes good sense to spend the few extra
minutes it takes to be sure everything is absolutely clean and
sanitized. Prior to storage, rinse and dry everything
carefully.
BetterBottle Adapters and SimpleFlo valves may
be damaged by temperatures exceeding 75° C (167° F). Read the
Wash/Sanitize section, under the Technical tab
at the top of this page, for important informaton.
The PET is very tough and will not scratch
easily; however, use caution not to scratch the precision, smooth,
sealing surfaces of Carboy and Pail Adapters. Always rinse Adapters thoroughly in clean water before
storing them.
Abrasive scouring pads and cleansers should
never be required, or used.
Soaking metal parts in cleaning or
sanitizing solutions can cause corrosion - they should be
removed.
Service
- The adapters and SimpleFlo valves
are very rugged, but dropping them on a hard surface may cause them
to chip or crack, so take reasonable precautions. Should it be
necessary to remove the O-ring from the groove in an Carboy Adapter
body, do not use sharp tools that might cut the Teflon encapsulation
of the O-ring. Press a thumb nail down between the rim of the groove
and working your way around the groove, push the O-ring up and out
of the groove. In general, when removing O-rings take great care not
to scratch the walls or base of the O-ring grooves. Plain O-rings
can usually be removed rather easily by holding the fitting in one
hand with your thumb nail across the O-ring to keep it from moving
in the groove, while you push a wave of the O-ring toward
your nail to make a bulge that you can roll out of the groove. Use
only BetterBottle O-rings and washers for replacement; they are made
of special materials that cannot be easily obtained through hardware
suppliers and other materials may not function correctly.
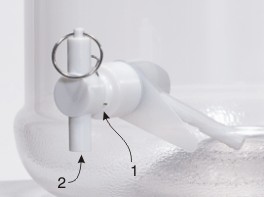
If a SimpleFlo valve leaks at point #2, refer
to the SimpleFlo valve
tab to the left of this page for
service suggestions.
If
a SimpleFlo valve and Adapter assembly leaks at point #1, there are
a number of possible causes: 1) The large O-ring on the SimpleFlo
valve has been damaged or its groove is scratched or dirty (see the
SimpleFlo valve
tab to the left of this page for
pertinent service suggestions), 2) The bore of the Adapter is
scratched where it seals with the large O-ring on the SimpleFlo
valve, or 3) The Racking Adapter is not sealing against the inner
wall of the carboy or pail and liquid is creeping along the thread
of the Racking Adapter to the first point where it can escape, which
is at point #1.
The large O-ring on a SimpleFlo valve only
penetrates about 1 cm (0.4") into the bore of a Racking Adapter, so
it is easy to inspect the bore for scratches visually with good
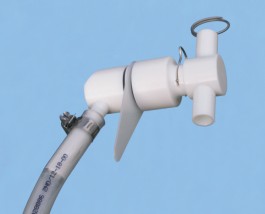
lighting. For confirmation that the valve seals of a SimpleFlo valve / Carboy Racking Adapter assembly are
in good condition, use a hose to connect the stem of the Adapter to
a faucet and apply water pressure. A pressure of between 1 and 2 bar
(15 and 30 PSI) is recommended. Higher pressures may cause the valve
to pop out of the Racking Adapter. Open the SimpleFlo valve to let
the connecting hose fill with water and then close the valve, dry
off the parts, and check for leaks.
If the Racking Adapter is not sealing against
the inner wall of the carboy or pail, remove the Adapter and inspect
the sealing O-ring and its groove for nicks, scratches or debris.
Also, inspect the port in the carboy or pail. Is the hole round and
is it a close fit for the thread of the Adapter? Is the inner edge
of the hole smooth and free of burrs that might prevent a good seal?
In the event that there is no apparent cause for the leak at point
#1, carefully clean the inner surface of the carboy or pail around
the hole, rinse off the sealing O-ring and its groove, and reinstall
the Adapter (see above), making sure that the nut is sufficiently
tight.
|
| Part
Numbers |
|
Carboy Racking Adapter (SimpleFlo
Valve not included, order separately) - BB-ADAPT(RK)
Tool for installing Racking Adapter in 5
& 6 gallon BetterBottle carboys - BB-ADAPT(RK)-IT
Replacement locking O-ring, Teflon slip
washers, and pointer for Racking Adapter -
BB-ADAPT(RK)-SERV(A)
Replacement Teflon encapsulated O-ring for
Racking Adapter - BB-ADAPT(RK)-SERV(B)
Pail Racking Adapter (SimpleFlo Valve not
included, order separately) - BB-ADAPT(PL)
Replacement set of O-rings, and Teflon slip
washer for Pail Racking Adapter - BB-ADAPT(PL)-SERV
|
| Packaging |
|
BB-ADAPT(RK) -
Individually packed
in a hang-hole, zipper bag
Bags of 20
individual packages - 2.19 lbs (0.99 Kg)
BB-ADAPT(RK)-IT -
Individual parts are not packaged
Boxes of 88 parts - 18" X 6" X 4" (45.7 cm X 15.2 cm X
10.1cm) 11.5 lbs (5.22 Kg)
BB-ADAPT(PL) -
Individually packed in a
hang-hole, zipper bag
Bags of 20
individual packages - 1.03 lbs (0.47
Kg)
|
|